


As parents, you are continually thinking of ways to give your children the best opportunities and exposure in their initial growing years for their holistic development. Schools and parents are deliberately trying to include creative school project ideas and craft ideas for kids as part of their initial learning and development activities. These activities help in building imagination, motor skills, self-esteem, self-expression, and much more for the kids. Education helps build on aptitude and intellect, while arts and crafts for kids help in building skills and the personality of the child.
DIY Project Ideas That Kids Can Make at Home
1. DIY Binoculars
What’s better than challenging a child’s creativity to create something new is to do so by upcycling simple everyday scrap that’s lying at home. Instead of throwing away empty tissue paper rolls, a creative DIY project ideas for your kid is to make upcycled binoculars out of them at home. Assembling these binoculars helps develop your child’s motor skills and imagination, while pretend play helps develop their social and emotional development.
Things you Need:
Empty toilet rolls, construction paper, a string, and tape. Stick two empty rolls together, side by side, with glue, and hold them together until the glue dries. Once dried, wrap the construction paper around the rolls using glue underneath and trim the excess. You can then decorate them using colors, crayons, stickers, etc. To wear the binoculars around the neck, take a string of the required length, punch two holes on either side of the binoculars, about ½ an inch from the edge and insert the string on either side of the binoculars, securing it with a knot on the inside.
2. Recycled Tin-Can Windsocks
In school, students learn that windsocks are used to gauge the speed and direction of the wind. Here’s a creative school project idea that helps nurture the creative side of your kid while also teaching them such important lessons with practical examples. These windsocks are super fun and easy to make.
Things Needed:
A clean and recycled can, acrylic paints, glue, and assorted ribbons. Start with painting the empty tin cans on the outside. Once the paint dries out, use glue to attach the assorted ribbons at the bottom. You can attach one ribbon at the top for hanging. You can further decorate the cans using glitter, stickers, letters, etc. and your DIY at-home windsocks are ready! Hang them outside and enjoy the beauty of science through simple objects at home.
3. Recycled Blanket Made from Used Clothes
What’s a creative way to preserve those old clothes that you can no longer use but associate so many memories with? Use it as a creative craft idea for your kids by helping them convert these clothes into a rug or thin summer blanket. These could include baby clothes your child has outgrown or gifts received on any special occasion.
Besides the emotional values attached to preserving these old clothes, stitching and sewing can help develop their finger’s dexterity and fine motor skills while also boosting their self-confidence. It also helps the child understand sizes and dimensions and make a judgment of placement, symmetry, etc..
Things Needed:
You will need old clothes, a needle, threads, and scissors. First, iron your clothes out to make them as wrinkle-free as possible. Then trim them each into squares of the same size. Create a rough collage on the floor of the trimmed squares for the final look of your artwork. Start stitching the squares one column at a time, attaching them from top to bottom. Once the columns are ready, you can stitch them horizontally with each other, and your rug or blanket is ready!
4. Birdhouse and Bird Feeder from Milk Cartons
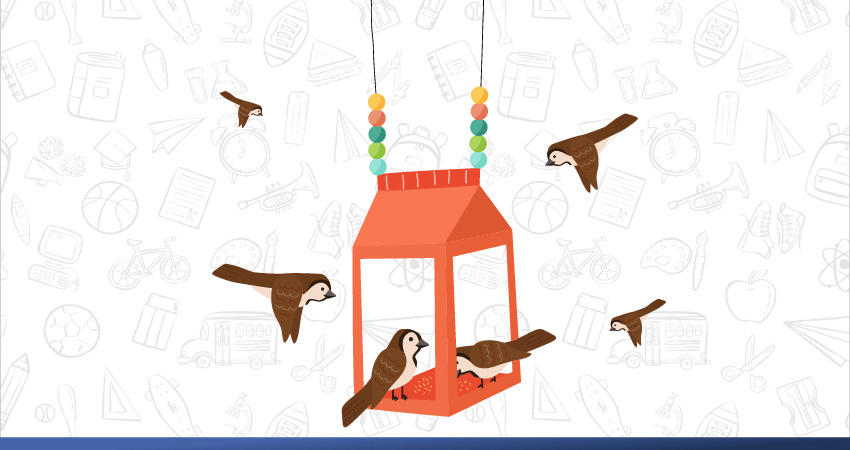
Other popular creative ideas for kids are recycling milk cartons into colorful birdhouses.
This school project idea renders tremendous benefits to developing a child’s brain and skills by teaching them how to creatively use scrap at home and make fun products out of them, while also inculcating in them the care for other living beings.
Things Needed:
You need a clean, dry milk box, glue, a sponge paintbrush, assorted color tissue paper squares, a wooden spoon, some twine, and a spray paint bottle.
First, spray paint the milk carton with a dark color all over to hide any text or graphics that are present on the carton. Next, coat all the sides of the box with glue and place tissue paper over the glue in any design that you like.
Once you have placed all the tissues, use the sponge brush gently over the tissues to ensure you glue them correctly to the box underneath. Allow the box to dry. Use a cardboard paper, folded into half along its width, for the roof. Apply the glue and tissues over this paper in the same fashion as earlier. If needed, you can cut off any extra cardboard.
For the birdhouse’s door, cut a rectangular patch from any side of the box using a knife. About an inch below this door, you can make an X-shaped cut with the knife. Insert the stem end of the wooden spoon through it, with the curved part of the spoon at the bottom. Before pushing the spoon right at the back, apply a fair amount of glue at the bottom; this ensures that the spoon is stuck well to the interior wall of the box.
To hang the birdhouse, you can cut two small holes on the roof, about 2 inches apart, and insert two ends of twine through them, securing each end with a thick and tight knot from underneath.
The birdhouse is now ready! Hang it on a tree, fill up the spoon with some grains, and wait for our feathered friends to inhabit it.
5. Clothing Clips Catapult
Bring up and nurture engineers through creative crafting ideas for kids, which allows them to achieve a fun yet educational toy to play with, using necessary everyday objects lying at home. One such creative DIY idea is to create catapults out of simple clothing clips.
It jogs the imagination of the child, helping them explore their artsy capabilities, and makes them understand the fundamental concepts of science used in our daily lives.
Using the catapult shows the kids how objects or things can be displaced from one point to another with more incredible speed and throttle and the trajectory these objects follow to reach the destination.
Things Needed:
A used and cleaned ice cream stick, a clothing clip, two rubber bands, and a bottle cap. The process is straightforward, place the clip along the ice cream strip vertically, secure from two ends using rubber bands spun tightly around the clip and the stick, and stick the bottle cap on the other side of the clip with glue. Place a marble inside the cap, press it down and release. Your DIY homemade school project idea is ready!
Arts And Crafts For The Win!
Irrespective of the craft or materials you choose, by including these creative DIY project ideas for kids, you are giving your child the priceless opportunity to learn essential life skills and lessons through simple activities while also making memories of a lifetime together.
Speak Your Mind
Save my name, email and website in this browser for next time I comment